패턴
용도 ---------------------------------------------------------------------- 데코레이터 한
인터페이스를 다른 인터페이스로 변환
어댑터 인터페스는 바꾸지 않고 책임(기능)만 추가
퍼사드 인터페이스를 간단하게 바꿈
1. 컨텍스트
Facade 패턴은 복잡한 서브 시스템에 통일된 인터페이스를 제공함으로써 복잡한 API를 단순화 시켜준다.
시스템을 서브 시스템 단위로 나누어 구성하는 것은 시스템의 복잡도를 낮춰주지만, 동시에 서브 시스템 사이에서의 통신 부하와 결합도가 증가하게
된다. 이러한 서브 시스템 사이의 의존도를 낮추고, 서브 시스템의 사용자 입장에서 사용하기 편리한 인터페이스를 제공하고자 하는 것이 facade
객체이다.
Facade 객체는 실생활에서의 고객 서비스 센터와 유사하다. 가령, 어떤 상품을 구매하는 과정에서 문제가 생겼다고 가정할 때, 고객이
문제의 성격에 따라 해당 부서에 직접 연락하는 것이 아니라 고객 서비스 센터를 통하는 것은 Facade 패턴에 대한 좋은 유추 사례가 될 수
있다.
2. 적용 영역
■ 복잡한 서브 시스템에 대해 간단한 인터페이스를 제공하기를 원하는 경우 ■ 클라이언트와
인터페이스의 구현 클래스 사이에 의존도가 높은 경우 ■ 서브 시스템을 레이어(layer)로 구분하고자 하는 경우
3.
구조
4. 적용 결과
■ 서브 시스템의 컴포넌트로부터 클라이언트를 격리하여, 클라이언트가 쉽게 서브 시스템을
이용할 수 있다. ■ 서브 시스템과 클라이언트 사이의 의존성을 낮춘다. ■ Facade 패턴을 사용한다고 해도, 필요한 경우 서브
시스템의 클래스에 직접 접근할 수도 있다. 즉, 일반화 정도(generality)와 개발의 편의성 사이에서의 적당한 합의점을 찾아야
한다.
5. 관련 패턴
■ Abstract Factory는 Facade와 함께 사용되어 서브 시스템에 독립적으로 서브
시스템의 객체를 생성하는 인터페이스를 제공한다. 또한, 특정 플랫폼에 국한된 클래스를 숨기기 위해 Facade 대신 사용할 수도 있다. ■
Mediator는 기존의 클래스의 기능을 추상화한다는 의미에서 Facade와 유사하다. 그러나, Mediator의 목적은 서로 직접적인 연관을
갖는 객체(colleague object) 사이에서의 커뮤니케이션을 추상화하는 것인데 반해, Facade는 서브 시스템의 인터페이스를 추상화하는
것이다. ■ 하나의 Facade 객체만이 요구되는 경우에는 Facade 객체가 Singleton 형태를 취하기도 한다.
자바 1.2 버전부터 제공되고 있지만 아직 다수의 개발자들이 잘 몰라서 활용을 잘 못하는 기능이 하나 있는데, 그 기능이 바로 쓰레드 단위로 로컬 변수를 할당하는 기능이다. 이 기능은 ThreadLocal 클래스를 통해서 제공되는데, 본 글에서는 ThreadLocal 클래스의 기본적인 사용방법과 활용 방법을 살펴보도록 하겠다.
ThreadLocal이란?
일반 변수의 수명은 특정 코드 블록(예, 메서드 범위, for 블록 범위 등) 범위 내에서만 유효하다.
{ int a = 10; ... // 블록 내에서 a 변수 사용 가능 } // 변수 a는 위 코드 블록이 끝나면 더 이상 유효하지 않다. (즉, 수명을 다한다.)
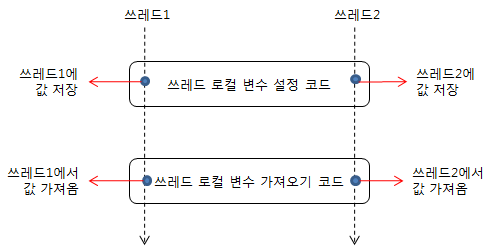
반면에 ThreadLocal을 이용하면 쓰레드 영역에 변수를 설정할 수 있기 때문에, 특정 쓰레드가 실행하는 모든 코드에서 그 쓰레드에 설정된 변수 값을 사용할 수 있게 된다. 아래 그림은 쓰레드 로컬 변수가 어떻게 동작하는 지를 간단하게 보여주고 있다.
위 그림에서 주목할 점은 동일한 코드를 실행하는 데, 쓰레드1에서 실행할 경우 관련 값이 쓰레드1에 저장되고 쓰레드2에서 실행할 경우 쓰레드2에 저장된다는 점이다.
ThreadLocal의 기본 사용법
ThreadLocal의 사용방법은 너무 쉽다. 단지 다음의 네 가지만 해 주면 된다.
ThreadLocal 객체를 생성한다.
ThreadLocal.set() 메서드를 이용해서 현재 쓰레드의 로컬 변수에 값을 저장한다.
ThreadLocal.get() 메서드를 이용해서 현재 쓰레드의 로컬 변수 값을 읽어온다.
ThreadLocal.remove() 메서드를 이용해서 현재 쓰레드의 로컬 변수 값을 삭제한다.
아래 코드는 ThreadLocal의 기본적인 사용방법을 보여주고 있다.
// 현재 쓰레드와 관련된 로컬 변수를 하나 생성한다. ThreadLocal<UserInfo> local = new ThreadLocal<UserInfo>();
// 로컬 변수에 값 할당 local.set(currentUser);
// 이후 실행되는 코드는 쓰레드 로컬 변수 값을 사용 UserInfo userInfo = local.get();
위 코드만으로는 ThreadLocal이 어떻게 동작하는 지 잘 이해가 되지 않을테니, 구체적인 예제를 이용해서 ThreadLocal의 동작 방식을 살펴보도록 하겠다. 먼저 ThreadLocal 타입의 static 필드를 갖는 클래스를 하나 작성해보자.
public class Context { public static ThreadLocal<Date> local = new ThreadLocal<Date>(); }
이제 Context 클래스를 사용해서 쓰레드 로컬 변수를 설정하고 사용하는 코드를 작성할 차례이다. 아래는 코드의 예이다.
class A { public void a() { Context.local.set(new Date());
B b = new B(); b.b();
Context.local.remove(); } }
class B { public void b() { Date date = Context.local.get();
C c = new C(); c.c(); } }
class C { public void c() { Date date = Context.local.get(); } }
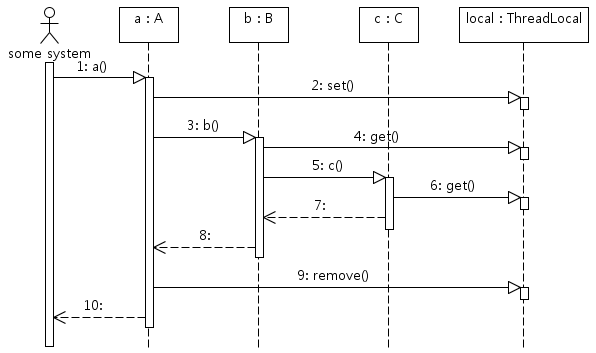
위 코드를 보면 A, B, C 세 개의 클래스가 존재하는데, A.a() 메서드를 호출하면 다음 그림과 같은 순서로 메서드가 실행된다.
위 그림에서 1~10은 모두 하나의 쓰레드에서 실행된다. ThreadLocal과 관련된 부분을 정리하면 다음과 같다.
2 - A.a() 메서드에서 현재 쓰레드의 로컬 변수에 Date 객체를 저장한다.
4 - B.b() 메서드에서 현재 쓰레드의 로컬 변수에 저장된 Date 객체를 읽어와 사용한다.
6 - C.c() 메서드에서 현재 쓰레드의 로컬 변수에 저장된 Date 객체를 읽어와 사용한다.
9 - A.a() 메서드에서 현재 쓰레드의 로컬 변수를 삭제한다.
위 코드에서 중요한 건 A.a()에서 생성한 Date 객체를 B.b() 메서드나 C.c() 메서드에 파라미터로 전달하지 않는다는 것이다. 즉, 파라미터로 객체를 전달하지 않아도 한 쓰레드로 실행되는 코드가 동일한 객체를 참조할 수 있게 된다.
ThreadLocal의 활용
ThreadLocal은 한 쓰레드에서 실행되는 코드가 동일한 객체를 사용할 수 있도록 해 주기 때문에 쓰레드와 관련된 코드에서 파라미터를 사용하지 않고 객체를 전파하기 위한 용도로 주로 사용되며, 주요 용도는 다음과 같다.
사용자 인증정보 전파 - Spring Security에서는 ThreadLocal을 이용해서 사용자 인증 정보를 전파한다.
트랜잭션 컨텍스트 전파 - 트랜잭션 매니저는 트랜잭션 컨텍스트를 전파하는 데 ThreadLocal을 사용한다.
쓰레드에 안전해야 하는 데이터 보관
이 외에도 쓰레드 기준으로 동작해야 하는 기능을 구현할 때 ThreadLocal을 유용하게 사용할 수 있다.
ThreadLocal 사용시 주의 사항
쓰레드 풀 환경에서 ThreadLocal을 사용하는 경우 ThreadLocal 변수에 보관된 데이터의 사용이 끝나면 반드시 해당 데이터를 삭제해 주어야 한다. 그렇지 않을 경우 재사용되는 쓰레드가 올바르지 않은 데이터를 참조할 수 있다.
이 주제에서는 WebSphere® Application Server에 대한 응용프로그램 프로그래밍 모델의 기초가 되는 J2EE(Java™ 2 Platform, Enterprise Edition) 스펙에 대해 설명합니다. WebSphere 프로그래밍 모델 확장은 J2EE 프로그래밍 모델을 확장함으로써 값을 추가합니다. 이 주제에서 J2EE 런타임 환경과 J2EE 응용프로그램 패키징 및 전개 부분을 비롯한 핵심적인 J2EE 개념에 대한 간략한 개요를 읽어 보십시오.
J2EE(Java 2 platform, Enterprise Edition) 스펙은 엔터프라이즈 응용프로그램 개발, 전개 및 실행을 위한 표준입니다. 궁극적인 정보 소스는 Sun Microsystems, Inc.의 웹 사이트 http://java.sun.com에서 사용 가능한 스펙입니다. WebSphere Application Server 문서는 편의상 링크와 J2EE 설명을 제공합니다.
빠른 참조: 1차 J2EE 1.4 스펙
Java Servlet 스펙 2.4
JavaServer Pages 스펙 2.0
Enterprise JavaBeans™ 스펙 2.1
Enterprise JavaBean - CORBA 맵핑 1.1
RMI/IIOP
Java IDL API
J2EE용 웹 서비스 버전 1.1
SAAJ(SOAP with Attachments API for Java) 스펙 1.2
JAX(Java API for XML) 처리 스펙 1.2
JAX(Java API for XML) 레지스트리 스펙 1.0
JAX(Java API for XML) 기반 RPC 스펙 1.1
JDBC 스펙, 3.0, 2.1 및 선택적 패키지 API(2.0)
Java 커넥터 아키텍처(JCA) 1.5
Java Message Service 스펙 1.1
JavaMail API 스펙 1.3
Java Authorization Contract for Containers 1.0
JNDI(Java Naming and Directory Interface) 스펙 1.2.1
IBM® WebSphere Application Server, 버전 6.1은 완전한 J2EE 인증 테스트 수행을 완료했습니다. 이 제품은 모든 J2EE 1.4 API를 지원합니다. http://java.sun.com/j2ee/compatibility.html에서 Sun Microsystems가 제공하는 J2EE 호환 가능 제품의 목록을 확인할 수 있습니다.
J2EE 1.4 스펙 및 일부 이전 스펙 레벨에 대한 연속 지원을 포함하는 이 제품의 버전에서 지원되는 스펙의 경우, 자세한 시스템 요구사항 페이지를 참조하십시오.
이 버전에서 사용되지 않는 스펙 레벨에 대한 정보는 폐기 및 제거된 기능의 내용을 참조하십시오.
Java 2 Platform, Enterprise Edition은 복수 층의 서버 기반 응용프로그램을 설계, 개발 및 전개하는 모든 부분에 적용되는 표준을 정의합니다. J2EE 스펙이 정의하는 표준 아키텍처는 다음 요소로 구성됩니다.
복수 층의 응용프로그램 개발용 표준 응용프로그램 모델
응용프로그램 호스팅용 표준 플랫폼
J2EE 플랫폼 제품이 J2EE 플랫폼 표준을 준수하는지 여부를 확인하는 데 필요한 호환성 테스트 수행
J2EE 플랫폼의 운영적인 정의를 내리는 참조사항 구현
J2EE 플랫폼 스펙에서는 J2EE 응용프로그램의 런타임 환경을 설명합니다. 이 환경에는 응용프로그램 컴포넌트, 컨테이너 및 자원 관리자 드라이버가 포함되어 있습니다. 이 환경 요소는 지정된 표준 서비스 세트와 통신합니다. 자세한 정보는 쓰리 티어 아키텍처의 내용을 참조하십시오.
J2EE 플랫폼 역할
J2EE 플랫폼은 또한 응용프로그램 개발 및 전개 라이프 사이클 동안 수행되는 많은 고유 역할을 정의합니다.
제품 프로바이더는 J2EE 플랫폼, API 및 기타 J2EE 스펙에 정의된 기능을 설계하고 제공합니다.
도구 프로바이더는 응용프로그램 컴포넌트를 J2EE 스펙의 일부로서 개발 및 패키징하는 데 사용하는 도구를 제공합니다.
응용프로그램 컴포넌트 프로바이더는 웹 컴포넌트, 엔터프라이즈 Bean, 애플릿 또는 응용프로그램 클라이언트를 작성하여 J2EE 응용프로그램에서 사용합니다.
응용프로그램 어셈블러는 컴포넌트 프로바이더가 개발한 컴포넌트 세트를 받아 EAR(Enterprise Archive) 파일 형식으로 어셈블합니다.
전개자는 엔터프라이즈 응용프로그램을 J2EE 플랫폼 제품에 일치하는 특정 운영 환경으로 전개를 담당합니다.
시스템 관리자는 응용프로그램이 실행되는 운영 환경을 담당합니다.
제품 프로바이더와 도구 프로바이더는 제품의 핵심입니다. 응용프로그램 컴포넌트 프로바이더 및 응용프로그램 어셈블러는 응용프로그램에서 핵심입니다. 전개자 및 시스템 관리자는 플랫폼 특정 아티팩트가 있는 J2EE 응용프로그램의 제공 및 플랫폼 런타임에 초점을 둡니다.
이 역할은 관련된 타스크 및 사람을 식별하도록 돕습니다. J2EE 응용프로그램을 개발하고 전개할 때 선택할 접근 방법을 결정하도록 도울 수 있기 때문에 이러한 역할 분리를 이해하는 것이 중요합니다.
J2EE 스펙은 고객에게 응용프로그램을 구매하거나 개발할 때 투자 보호를 보장하기 위해 사용할 수 있는 표준을 제공합니다. 알기 쉬운 독립적인 호환성 테스트를 통해 벤더가 J2EE 표준을 준수하고 있음이 확인됩니다.
J2EE 준수 아키텍처 전개의 일부 장점은 다음을 포함합니다.
표준 컴포넌트, 서비스 및 클라이언트에 기초하는 단순화된 아키텍처. 아키텍처는 한 번 쓰기(write-once), 어느 위치에서나 실행(run-anywhere) Java 기술을 최대화합니다.
믿을 만한 비즈니스 트랜잭션을 위한 JDBC(Java DataBase Connectivity), JMS(Java Message Service), JCA(Java Connector Architecture), Java IDL(Java Interface Definition Language), JavaMail API 및 Java Transaction API(JTA 및 JTS).
예를 들어 다중 시스템에 컨테이너를 분배하고 데이터베이스 연결 풀링을 사용하는 요구를 충족하는 확장성
응용프로그램 개발 도구와 표준 솔루션을 제공하는 벤더 컴포넌트 최상의 선택
단일 사인온(SSO) 지원을 제공하는 융통성 있는 보안 모델, 레거시 보안 설계와 통합 및 응용프로그램 컴포넌트 보안에 대한 일관된 접근 방법
J2EE 스펙은 많은 공헌자가 있는 산업 전반에 걸친 노력의 결과입니다. IBM은 80 퍼센트가 넘게 J2EE API를 정의했습니다.
J2EE 컨테이너는 응용프로그램 컴포넌트의 런타임 지원을 제공합니다. J2EE 응용프로그램에는 각 응용프로그램 컴포넌트 유형에 대해 하나의 컨테이너가 있어야 합니다. 응용프로그램 컴포넌트와 서비스 세트 사이에 컨테이너가 존재함으로써 J2EE 스펙은 응용프로그램 컴포넌트용 API의 연합된 보기를 제공할 수 있습니다.
컨테이너는 서비스에 액세스하기 위해 사용되는 응용프로그램 컴포넌트에 API를 제공합니다. 또한 컨테이너는 보안, 자원 풀링, 상태 관리, 이름 및 트랜잭션 문제를 다룰 수 있습니다.
표준 서비스
J2EE 플랫폼은 컴포넌트에 서로 상호작용할 수 있도록 사용할 수 있는 표준 서비스 세트를 제공합니다. 각 표준 서비스에 대한 설명은Sun 제품 웹 페이지의 내용을 참조하십시오.
J2EE 패키징
assembly 프로세스 중, J2EE컴포넌트는 모듈로 패키지화되었습니다. 모듈은 응용프로그램으로 패키지화되었습니다. Application Server에 응용프로그램을 전개할 수 있습니다. 각 모듈과 응용프로그램에는 J2EE 전개 설명자가 포함되어 있습니다. 전개 설명자는 응용프로그램을 전개하기 위한 명령어를 제공하는 XML 파일입니다.특정 제품의 자세한 정보는 어셈블링 응용프로그램을 참조하십시오.
이건 컴파일러가 일반적으로 경고하는 내용 중 "이건 하지마"하고 제외시킬 때 쓰입니다. 따라서 어떤 경고를 제외시킬지 옵션을 줄 수 있어요.
몇 가지 정리해보면
1. all : 모든 경고를 억제 2. cast : 캐스트 연산자 관련 경고 억제 3. dep-ann : 사용하지 말아야 할 주석 관련 경고 억제 4. deprecation : 사용하지 말아야 할 메소드 관련 경고 억제 5. fallthrough : switch문에서의 break 누락 관련 경고 억제 6. finally : 반환하지 않는 finally 블럭 관련 경고 억제 7. null : null 분석 관련 경고 억제 8. rawtypes : 제네릭을 사용하는 클래스 매개 변수가 불특정일 때의 경고 억제 9. unchecked : 검증되지 않은 연산자 관련 경고 억제 10. unused : 사용하지 않는 코드 관련 경고 억제
이 외에도 hiding, incomplete-switch, nls, restriction, serial, static-access 등의 옵션이 있어요.
사용 예는 아래와 같습니다. @SuppressWarnings("unused")
참고로 unused는 컴파일러 경고가 발생하는 코드 거의 모든 부분 상단에 배치가 가능해요
(Spring API의 org.springframework.web.multipart 패키지를 보면 두 개의 라이브러리를 지원하는 패키지가 따로 있음을 확인할 수 있다. )
Spring 프레임워크에서는 파일업로드에 대한 구현을 이미 다 만들어 놓은 MultipartResolver란 클래스가 있는데 여기에는 재미있는 property가 있다. uploadTempDir 이란 넘인데 이 속성명에서 풍기는 의미에서 처럼 Spring 프레임워크는 업로드 받을 임시저장소를 가지고 있다. 예를 들어 100명의 접속자가 500MB의 파일을 동시에 올린다고 생각해 보자. 서버는 이를 처리하기 위해 50GB의 메모리를 사용하게 되는데 이것은 서버에 과부하를 가져다 주게 된다. Spring 프레임워크는 이를 방지하기 위해 임시저장소를 두어 업로드된 파일에 대한 버퍼를 마련해 둔 것이다.
친절하게 업로드될 max사이즈도 정할 수 있음을 알 수 있다. 참고로 Resolver란 이름이 붙은 클래스에 대해서 우리가 직접 IoC를 적용할 필요가 없다. viewResolver에서도 확인할 수 있는데 우리는 어디에서도 직접적으로 viewResolver를 사용하고 있지 않다. 이것은 Spring 프레임워크가 처리하는 부분으로 우리가 감히 손대기에는 큰 일이 아닐까 한다.
Spring 프레임워크 워크북 에서는 업로드 기능에 대해서 FileUploadUtil 이란 클래스를 사용하고 있는데 사실 이 클래스는 불필요한 클래스다. 이미 Spring 프레임워크에서 기능을 제공해 주고 있는데 똑같은 기능을 만들 필요는 없을 듯하다. 그럼 그 기능을 해주고 있는 넘은 누구며 어떤 메소드냐?
아래와 같이 첨부된 파일을 정의하는 모델이 있다고 하자.
public class AttachFile { Integer fileId; // 파일ID String userFileName; // 실제 파일명 String saveFileName; // 경로포함된 파일명 String contentType; // content-type Long fileSize; // 파일 사이즈
.......... getter/setter 생략
}
그리고 첨부된 파일을 속성으로 가지는 모델이 있다.
public class FileUploadBean {
Integer fileUploadId; String name; AttachFile file1; // 파일 1 AttachFile file2; // 파일 2 AttachFile file3; // 파일 3
............ getter/setter 생략
}
MultiPartFile을 AttachFile로 변경해 주는 FilePropertyEditor이 있다.
public class FilePropertyEditor extends PropertyEditorSupport { String uploadRepository ;
@Override public void setValue(Object value) { if (value instanceof MultipartFile) { MultipartFile multipartFile = (MultipartFile) value;
if (multipartFile.isEmpty()) { super.setValue(null); return ; }
public String getUploadRepository() { return uploadRepository; }
public void setUploadRepository(String uploadRepository) { this.uploadRepository = uploadRepository; } }
makeUploadTempDir() 메소드는 UUID를 이용하여 랜덤하게 폴더명을 만드는 것으로 중복된 파일명 처리를 위해 멋(?)을 부렸다. 우째튼 결론은 굵은 글씨체로 되어 있는 transferTo(String path) 메소드인데 API문서의 설명을 보면 감이 올 것이다.
책의 예제를 뒤져보면 Control 쪽에서 실제 저장소를 정의해 두었는데 FilePropertyEditor를 이해했다면 실제 저장소를 PropertyEditor에 정의하는 게 옳을 것이다. 그리고 MultipartResolver에서 정의한 임시 저장소와 실제 저장소는 다르다는 것을 다시 한번 더 확인해 두는 바이다
Pattern p = Pattern.compile("(a*)(b)");
Matcher m = p.matcher("aaaaab");
if (m.matches()) {
    for (int i = 0; i < m.groupCount() + 1; i++) {
        System.out.println(i + ":" + m.group(i));
    }
} else {
    System.out.println("not match!");
}

result>
0:aaaaab
1:aaaaa
2:b
0번째는 매칭된 부분.
String a = "I love her";
System.out.println(a.replaceAll("([A-Z])", "\"$1\""));

result>
"I" love her
자바도 $1을 쓸 수 있다.
Pattern p = Pattern.compile("cat");
Matcher m = p.matcher("one cat two cats in the yard");
StringBuffer sb = new StringBuffer();
while (m.find()) {
    m.appendReplacement(sb, "dog");
    System.out.println(sb.toString());
}
m.appendTail(sb);
System.out.println(sb.toString());

result>
one dog
one dog two dog
one dog two dogs in the yard
PMDis a static code analyzer for Java. Developers use PMD to comply with coding standards and deliver quality code. Team leaders and Quality Assurance folks use it to change the nature of code reviews. PMD has the potential to transform a mechanical and syntax check oriented code review into a to dynamic peer-to-peer discussion.
This article looks at PMD as an Eclipse plugin and the ways it can be used to improve the code quality and shorten the code review process. Since every organization has a unique set of coding conventions and quality metrics, it also demonstrates how to customize PMD to meet these needs.
What is PMD?
PMD works by scanning Java code and checks for violations in three major areas:
Compliance with coding standardssuch as:
Naming conventions - class, method, parameter and variable names
Class and method length
Existence and formatting of comments and JavaDocs
Coding antipatternssuch as:
Empty try/catch/finally/switch blocks
Unused local variables, parameters and private methods
Empty if/while statements
Overcomplicated expressions - unnecessary if statements, for loops that could be while loops
Classes with high Cyclomatic Complexity measurements
Cut and Paste Detector (CPD)- a tool that scans files and looks for suspect code replication. CPD can be parameterized by the minimum size of the code block.
In its current version, PMD comes packaged with149 rulesin19 rulesets. Most of these rules can be parameterized at runtime by supplying properties or parameters. The standard package offers many well-thought rules. In addition users also have the ability to add their own rules for particular coding convention or quality metrics. Here are some of the rules distributed with PMD:
EmptyFinalizer- If the finalize() method is empty, then it does not need to exist.
EmptyFinallyBlock- Avoid empty finally blocks - these can be deleted.
OnlyOneReturn- A method should have only one exit point, and that should be the last statement in the method.
CyclomaticComplexity- Complexity is determined by the number of decision points in a method plus one for the method entry. The decision points are 'if', 'while', 'for', and 'case labels'. Generally, 1-4 is low complexity, 5-7 indicates moderate complexity, 8-10 is high complexity, and 11+ is very high complexity.
TooManyFields- Classes that have too many fields could be redesigned to have fewer fields, possibly through some nested object grouping of some of the information. For example, a class with city/state/zip fields could instead have one Address field.
LongVariable- Detects when a field, formal or local variable is declared with a long name.
NoPackage- Detects when a class or interface does not have a package definition.
Where to find it?
PMD started as a standalone application and today it is an open-source project hosted underSourceForge.net. It is still distributed as a standalone application, however there is now substantial support for most popular Java IDEs. The PMD team has developed plugins for JDeveloper, Eclipse, JEdit, JBuilder, Omnicore's CodeGuide, NetBeans/Sun Java Studio Enterprise/Creator, IntelliJ IDEA, TextPad, Maven, Ant, Gel, JCreator, and Emacs. This article covers PMD's Eclipse plugin only.
PMD binaries and source files can bedownloadedfrom PMD's Sourceforge directory. For an open-source project, PMD is relatively well-documented. Among the items inPMD's main siteare topics such as installation, PMD-related products and books, best practices, licensing info, usage guides and more. There is also a section for developers interested in joining the project. The following items target the latter: compiling PMD, project info, project reports, and development process.
How to install it?
The easiest way to install PMD is by using the remote update site. Users behind firewalls should checkproxy settingsbefore going any further. If these settings are misconfigured the updater will not work. PMD also supplies a zip file for manual installation. Download the file and follow the readme. Demonstrated below is installing PMD via the Eclipse Software Updater.
Launch Eclipse.
Navigate toHelp|Software Updates|Find and Install...
Select "Search for new features to install" and clickNext
ClickNew Remote Site...
Enter a name (PMD) and the URLhttp://pmd.sourceforge.net/eclipse
InSites to include in searchcheck PMD and clickFinish
In theSearch Resultsdialog check PMD for Eclipse 3 3.1.0 and clickNext
Accept the terms of the license agreements and clickNext
ClickFinish.
Wait for Eclipse to download the required jar files, then clickInstall
Restart the workbench. This will load the PMD plugin.
Navigate toWindow|Show View|Other...
SelectPMD|PMD Violations
PMD Violations view should appear at the bottom pane
How to use it?
Before launching Eclipse make sure you have enough memory for PMD. This is particularly important when analyzing large projects. In these situations PMD tends to be memory-hungry. Hence, make sure to start with as much memory as you can afford, for example 512M (eclipse.exe-vmargs -Xmx512M)
Launch Eclipse
If you have previously created a Java Project, skip to Step 6. Otherwise clickFile|New|Project...
SelectJava Projectand clickNext
Enter a project name (QA Project) and leave everything else in the default state.
ClickFinish. Eclipse will ask if you want to switch to the Java Perspective. ClickYes.
In the Package Explorer right-click on QA Project and selectNew|Class
In the following dialog enter the class name asYingand clickFinish
A new classYingis created in project's default package. Paste the following code into the new class:
public class Ying {

	private static final String gOOD = "GOOD";

	public void StartSomething() {
		System.out.println("Hello PMD World!");
	}

	public String thisIsCutAndPaste(String pFirst, int pSecond) {
		System.out.println("New world");
		return "New world";
	}
}
Similarly, create a second classYangand paste the following code:
public class Yang extends Thread {
	public Yang(String str) {
		super(str);
	}

	public void run() {
		for (int i = 0; i < 10; i++) {
			System.out.println(i + " " + getName());
			try {
				sleep((long) (Math.random() * 1000));
			} catch (InterruptedException e) {
			}
		}
		System.out.println("DONE! " + getName());
	}

	public void WRITE_SOMETHING(String INPUT_PARAMETER) {
		System.out.println(INPUT_PARAMETER);
	}

	public static void main(String[] args) {
		new Yang("Good").start();
		new Yang("Bad").start();
	}

	public String thisIsCutAndPaste(String pFirst, int pSecond) {
		System.out.println("New world");
		return "New world";
	}
}
In the Package Explorer right-click on QA Project and selectPMD|Check Code With PMD
Wait for PMD to scanYingandYang
If PMD Violations view is not open navigate toWindow|Show View|Other...and selectPMD|PMD Violations
In thePMD Violationsview notice a list of 17 violations. In large projects this list could easily grow up to several thousand. This is one of the reasons PMD allows violations be filtered by priority. Priority is a configurable attribute of a PMD rule. PMD assigns priorities from 1 to 5 and each priority is represented by a colored square at the top-right corner of the view. These little squares are actually clickable on-off switches used to control the visibility of the violations they represent. The results table itself is well laid out and most columns are sortable. It is also possible to get more detail on a violation by simply right-clicking it and selectingShow rule. PMD pops-up a dialog with information such as rule name, implementation class, message, description and an example. This feature can be helpful when trying to makes sense of a new rule or letting inhouse developers know about a particular company rule or coding convention.
Finally, in thePMD Violationstable it is possible to add review annotations to the source where the violation occurred. This can be an effective way to mark target files for further review. Just right-click on any violation in the list and selectMark review. PMD will insert a review annotation to the Java source right above the violation line itself. The review annotation should look like this:
// @PMD:REVIEWED:MethodNamingConventions: by Levent Gurses on 3/28/04 5:04 PM
Review annotations can be removed anytime by right-clickingQA Projectand selectingPMD|Clear violations reviews. Similarly, PMD Violations can be cleaned-up by right-clickingQA Projectand selectingPMD|Clear PMD Violations..
Finding Cut and Paste Code
Repeated (Cut&Paste) code generally indicates poor planning or team coordination. Therefore, refactoring classes with repeating code should be given a high priority. PMD can help identify these classes by scanning the code in a way similar to PMD violation checks. The number of lines of similarity (the metrics used by PMD to match code patterns) is 25 by default and can be set in PMD's Preferences page.
In Package Explorer right-click on QA Project and selectPMD|Find Suspect Cut And Paste
PMD creates a folderreportsunderQA Projectand stores the result text file
SelectWindow|Show View|Navigator
In Navigator view click onQA Projectand then on thereportsfolder
The report filecpd-report.txtshould look like this:
=====================================================================
Found a 8 line (25 tokens) duplication in the following files:
Starting at line 6 of C:\temp\QA Project\Ying.java
Starting at line 23 of C:\temp\QA Project\Yang.java
		new Yang("Bad").start();
	}

	public String thisIsCutAndPaste(String pFirst, int pSecond) {
		System.out.println("New world");
		return "New world";
	}
}
Generating Reports
After running a lengthy violation check it may be desirable to share the findings with peers or store them for later reference. For situations of this kind PMD provides a handy reporting tool capable of generating reports in multiple formats. Currently PMD can generate reports in HTML, XML, plain text as well as Comma Separated Value (CSV) formats.
In Package Explorer right-click on QA Project and selectPMD|Generate reports
PMD creates a folderreportsunderQA Projectand stores four report files
SelectWindow|Show View|Navigator
In Navigator view click onQA Projectand then on thereportsfolder
Of the four report filespmd-report.htmlshould look like this:
#
File
Line
Problem
1
Yang.java
8
System.out.print is used
2
Yang.java
14
System.out.print is used
3
Yang.java
17
Method name does not begin with a lower case character.
4
Yang.java
17
Method names should not contain underscores
5
Yang.java
17
Parameter 'INPUT_PARAMETER' is not assigned and could be declared final
6
Yang.java
18
System.out.print is used
7
Yang.java
21
Parameter 'args' is not assigned and could be declared final
8
Yang.java
27
System.out.print is used
9
Ying.java
1
Each class should declare at least one constructor
10
Ying.java
3
Avoid unused private fields such as 'gOOD'
11
Ying.java
5
Method name does not begin with a lower case character.
12
Ying.java
6
System.out.print is used
13
Ying.java
9
Parameter 'pFirst' is not assigned and could be declared final
14
Ying.java
9
Parameter 'pSecond' is not assigned and could be declared final
15
Ying.java
10
System.out.print is used
Customizing PMD
The easiest way to begin customizing PMD is by playing with existing rules. Adding new rules is also possible as well as removing unnecessary ones, however these require more knowledge. Since experimenting with existing rules is the easiest, it makes sense to start with them.
Each PMD rule has six attributes:
Rule name - immutable
Rule implementation class - immutable
Priority
Message
Description
Example
Of these six attributes the first two are immutable - they cannot be customized by users. While Message, Description and Example are text-based properties and can accept any String data, Priority is an integer field ranging from 1 to 5.
PMD stores rule configuration in a special repository referred to as the Ruleset XML file. This configuration file carries information about currently installed rules and their attributes. Changes made through the Eclipse Preferences page are also stored in this file. In addition, the PMD Preferences page allows exporting and importing Rulesets which makes them a convenient vehicle for sharing rules and coding conventions across the enterprise.
Before starting the customization it may be a good idea to back-up existing configuration.
Back in the Rules configuration page scroll-down and click onSystemPrintlnrule
With the rule selected, click thePrioritycolumn and change the priority from Error (2) to Information (5)
With the rule still selected, click theEdit rule...button on the right
Change the Message, Description and Example. ClickOKwhen done
ClickExport rule set...
Enter a new file name e.g.pmd-rules-customized.xmland clickSave
Compare the two XML files - they are different
In Package Explorer right-click on QA Project and selectPMD|Clear PMD Violations
In Package Explorer right-click on QA Project and selectPMD|Check Code With PMD
Wait for PMD to finish the scan
If PMD Violations view is not open navigate toWindow|Show View|Other...and selectPMD|PMD Violations
NoticeSystemPrintlnis now priority 5
Adding New Rules
PMD allows new rules in two formats: Java-based rules where the rule is written as a Java implementation class and XPath rules where the rule is defined in an XML file. Both ways are equally applicable and the choice is probably a matter of preference. This article will demonstrate creating a new rule with both Java and XPath. The rule,ParameterNameConvention, will be a simple coding convention checker making sure all method parameters start with a lowercase "p". To accomplish its task the rule will take advantage of regular expressions and will enforce the following expression to all method parameters:[p][a-zA-Z]+. Later this expression will be made into a rulepropertywhich will allow further customization by rule users.
This is all good, but before going any further into the custom PMD rules let's see how this PMD thing actually works.
How PMD works?
PMD relies on the concept ofAbstract Syntax Tree (AST), a finite, labeled tree where nodes represent the operators and the edges represent the operands of the operators. PMD creates the AST of the source file checked and executes each rule against that tree. The violations are collected and presented in a report. PMD executes the following steps when invoked from Eclipse (Based on PMD's documentation):
The Eclipse PMD plugin passes a file name, a directory or a project to the core PMD engine (Also part of the Eclipse plugin, however housed in a separate package). This engine then uses the RuleSets as defined in the PMD preferences page to check the file(s) for violations. In the case of a directory or project (multiple source files) the plugin executes the following steps for each file in the set.
PMD uses JavaCC to obtain a Java language parser
PMD passes an InputStream of the source file to the parser
The parser returns a reference of an Abstract Syntax Tree back to the PMD plugin
PMD hands the AST off to the symbol table layer which builds scopes, finds declarations, and find usages
If any rules need data flow analysis, PMD hands the AST over to the DFA layer for building control flow graphs and data flow nodes
Each Rule in the RuleSet gets to traverse the AST and check for violations
The Report is generated based on a list of RuleViolations. These are displayed in the PMD Violations view or get logged in an XML, TXT, CSV or HTML report.
Abstract Syntax Tree
In computer science, anAbstract Syntax Tree(AST) is a finite, labeled, directed tree, where the nodes are labeled by operators, and the edges represent the operands of the node operators. Thus, the leaves have nullary operators, i.e., variables or constants. In computing, it is used in a parser as an intermediate between a parse tree and a data structure, the latter which is often used as a compiler or interpreter's internal representation of a computer program while it is being optimized and from which code generation is performed. The range of all possible such structures is described by the abstract syntax. An AST differs from a parse tree by omitting nodes and edges for syntax rules that do not affect the semantics of the program. The classic example of such an omission is grouping parentheses, since in an AST the grouping of operands is explicit in the tree structure. Creating an AST in a parser for a language described by a context free grammar, as nearly all programming languages are, is straightforward. Most rules in the grammar create a new node with the nodes edges being the symbols in the rule. Rules that do not contribute to the AST, such as grouping rules, merely pass through the node for one of their symbols. Alternatively, a parser can create a full parse tree, and a post-pass over the parse tree can convert it to an AST by removing the nodes and edges not used in the abstract syntax.
From Wikipedia
PMD Class Hierarchy
Since PMD works on a tree data structure, its unit of operation isNode. Every construct in a Java source file examined by PMD is assigned a node in the Abstract Syntax Tree. These nodes are then visited by all rules in the ruleset and the methodpublic Object visit(SimpleNode node, Object data)of the rule implementation class gets invoked. It is inside this method where the rule logic is defined.
In PMD every node extendsnet.sourceforge.pmd.ast.SimpleNode. This concrete class implementsnet.sourceforge.pmd.ast.Nodeand has 104 first-level children as well as an additional 8 second-level children coming fromnet.sourceforge.pmd.ast.AccessNode.
This screenshot captures portion ofSimpleNodes children. The entire list is available with the source distribution of PMD. This class hierarchy is important for writing custom PMD because each custom rule will rely on one or more of PMD's SimpleNodes to accomplish its task.
This is a good place to see the Abstract Syntax Tree in action.
In Java Perspective, go to Package Explorer and double-click onQA Projectand next(default package)
Right-click onYing.javaand selectPMD|Generate Abstract Syntax Tree
Click onWindow|Show View|Navigator
In Navigator view click onQA Project
The Abstract Syntax Tree fileYing.astis located in the root level. It should look like this:
This AST report gives a full synopsis of the examinee, in this caseYing.java. It is possible for example to gain insight about the method parameterpFirstby expanding theFormalParameternode. Studying this Abstract Syntax Tree can contribute to a better understanding of how a Java source file is examined and what variables play role in the process. This in turn could prove useful when crafting custom rules.
Writing Custom PMD Java Rules
Now, going back toParameterNameConventionit is time to crank some code. This article will create a Java class for the rule implementation and package it as a plugin fragment. A fragment is an extension of a plug-in and all the classes and resource files it contains are automatically added to the main plug-in classpath. Since PMD searches main plugins classpath for rule implementation classes the fragment will be automatically available. In addition, this structure will allow for faster development and easier distribution.
Creating the plugin fragment in Eclipse
In Eclipse Navigate toWindow|Open Perspective|Other...
SelectPlug-in Development
In Package Explorer right-click and selectNew|Project...
In the New Project wizard selectPlug-in Development|Fragment Projectand clickNext
Enter a project name of your liking, e.g.com.jacoozi.pmd.rulesand clickNext
In the Fragment Content dialog enter details for the fragment and the host plug-in. ClickBrowse...to locate the host plugin.
In the Plug-in Selection dialog typenet.sourceforge.pmd.eclipsethen select the only item in the list. ClickOK
Back in the Fragment Content dialog selectGreater or Equalfor Match Rule. This will ensure that future upgrades to the host PMD plug-in do not affect the fragment. The dialog should look like the following:
ClickFinish
Implementing the rule class
In Package Explorer right-click on the source foldersrcand selectNew|Class
Enter a package name of liking, e.g.com.jacoozi.pmd.rules
Enter the class nameParameterNameConvention
ClickFinish
Paste the following code into the new Java class:
package com.jacoozi.pmd.rules;

import java.util.Iterator;

import net.sourceforge.pmd.AbstractRule;
import net.sourceforge.pmd.RuleContext;
import net.sourceforge.pmd.RuleViolation;
import net.sourceforge.pmd.ast.ASTFormalParameter;
import net.sourceforge.pmd.ast.ASTMethodDeclaration;
import net.sourceforge.pmd.ast.ASTVariableDeclaratorId;

/**
 * @author Levent Gurses
 * Copyright 2005 Jacoozi
 */
public class ParameterNameConvention extends AbstractRule {
	private final static String PATTERN = "[p][a-zA-Z]+";

	public Object visit(ASTMethodDeclaration node, Object data) {
		RuleContext result = (RuleContext) data;
		String rulePattern = (!getStringProperty("rulePattern").equalsIgnoreCase("")) ? getStringProperty("rulePattern") : PATTERN;
		if (node.containsChildOfType(ASTFormalParameter.class)) {
			Iterator iterator = node.findChildrenOfType(ASTFormalParameter.class).iterator();
			while (iterator.hasNext()) {
				ASTFormalParameter element = (ASTFormalParameter) iterator.next();
				Iterator decIdIterator = element.findChildrenOfType(ASTVariableDeclaratorId.class).iterator();
				while (decIdIterator.hasNext()) {
					ASTVariableDeclaratorId decElement = (ASTVariableDeclaratorId) decIdIterator.next();
					if (!decElement.getImage().matches(rulePattern)) {

						result.getReport().addRuleViolation(new RuleViolation(this,
								node.getBeginLine(), "Parameter '" + decElement.getImage() + "' should match regular expression pattern '" +
								rulePattern + "'", result));
					}
				}
			}
		}
		return result;
	}
}
Couple of points here. First, notice it extendsimport net.sourceforge.pmd.AbstractRule. All custom rules must extend this class. Second, notice the AST traversal starts from the method declaration. It then iterates through its children and looks forASTFormalParameter. Finally, it compares thenode.getImage()against the rule regular expression. Notice that a mismatch causes the creation of a newRuleViolation. As a side note, notice also the regular expression is fed into the rule as a property.
Testing the new rule
The rule class is now complete and there are no compilation errors (red Xs). This means it is ready for testing.
In Plug-in Package Explorer right-click oncom.jacoozi.pmd.rulesand selectRun As|Eclipse Application(Alt+Shift+X,E). Alternatively, to launch a Debug session click onRun|Debug As|Eclipse Application(Alt+Shift+D,E)
Eclipse will launch a fresh instance to test the new PMD rule. In Package Explorer right-click and selectImport...|Existing Project into Workspace. ClickNext
In Import Projects clickBrowseto locate theQA Project. Navigate to C:\Documents and Settings\[Your name]\workspace and clickOK. This assumes you created theQA Projectin Eclipse's default workspace. If not, locate the project in your custom workspace.
ClickAdd rule..., fill the form with the following and clickOK
Rule name:
ParameterNameConvention
Rule implementation class:
com.jacoozi.pmd.rules.ParameterNameConvention
Message:
Method parameters should begin with a lowercase "p"
Description:
Method parameters should always begin with a "p". This is equivalent to the parameters complying with regular expression [p][a-zA-Z]+. This expression can be changed the preferences page by adding a property "rulePattern".
Example:
public void bringItHome( String pName, int pNumber, boolean pDoneThat, List pTr)
Change rule priority toError high
Click onAdd property...and enterrulePatternas name and[p][a-zA-Z]+as value.
Click onOKand agree to rebuild.
In Package Explorer right-click onQA Projectand selectPMD|Check Code with PMD. Open the PMD Violations view. It should display threeParameterNameConventionviolations inYang.java.
Packaging and distributing the new rule
What happens if you want to share a rule with colleagues or make it a common convention for the team? Simple. The fragment project can be exported as a zip file making it easy to distribute. First, export the fragment project; next unzip the file into Eclipse's plugins folder and it's done.
In Plug-in Package Explorer right-click oncom.jacoozi.pmd.rulesand selectExport...|Deployable plug-ins and fragments
Enter a name for the zip file, e.g.com.jacoozi.pmd.rulesand clickFinish. Eclipse will export the fragment classes into a new archivecom.jacoozi.pmd.rules.zip.
Export ruleset. In PMD Preferences page ClickExport rule set.... Zip this file and the fragment zip from previous step together. The portable plugin fragment is now ready for distribution.
Installing the new rule
What happens if you want to share a rule with colleagues or make it a common convention for the team? Simple. The fragment project can be exported as a zip file making it easy to distribute. First, export the fragment project; next unzip the file into Eclipse's plugins folder. That's pretty much it.
Unzip the archive to the target machine. If the target environment uses default Eclipse settings, unzip the file under C:\eclipse (The zip file contains a folderplugins)
Navigate to PMD Preferences page and clickImport rule set.... Select the ruleset file from previous step and clickOK
ClickOKto close the Preferences page.
The new rule is now ready for use.
Writing Custom PMD XPath Rules
The second way to add custom rules to PMD requires some XPath knowledge. XPath has been out for some time now and has proven to be an effective query language for DOM-based XML. Detailed XPath would fill an entire book, therefore for the sake of time and space it is left out. The following Wikipedia definition provides a basic idea of what the language is all about.
XPath
XPath(XML Path Language) is a terse (non-XML) syntax for addressing portions of an XML document.
Originally motivated by a desire to provide a common syntax and behavior model between XPointer and XSL, XPath has rapidly been adopted by developers as a small query language.
The most common kind of XPath expression (and the one which gave the language its name) is a path expression. A path expression is written as a sequence of steps to get from one set of nodes to another set of nodes. The steps are separated by "/" (i.e. path) characters. Each step has three components:
Axis Specifier
Node Test
Predicate
The notation is compact, allowing many defaults and abbreviations for common cases.
The simplest kind of path expression takes a form such as /A/B/C, which selects C elements that are children of B elements that are children of the A element that forms the outermost element of the document.
XPath syntax is designed to mimic URI (Uniform Resource Identifier) syntax or file name syntax. More complex expressions can be constructed by specifying an axis other than the default child axis, a node test, other than a simple name, or predicates, which can be written in square brackets after each step. For example, the expression /A/B/following-sibling::*[1] selects all elements (whatever their name) that immediately follow a B element that is a child of the outermost A element.
From Wikipedia
What is needed here is a way to implementParameterNameConventionas an XPath rule. The chief advantage of XPath rules in PMD is the power, elegance and simplicity of XPath compared to Java. The main disadvantage is that not many people are familiar with XPath. With that being said, let's see how much time XPath can actually save.
To save confusion, first remove the JavaParameterNameConventionfrom Eclipse. Navigate toWindow|Preferences...|PMD|Rules configuration
Scroll-down the list and selectParameterNameConvention. ClickRemove rule
Now, create the new XPath rule. In PMD Rules configuration dialog clickAdd rule...
This time checkXPath rule. The rule implementation class will automatically change tonet.sourceforge.pmd.rules.XPathRule. Fill the rest of the form with the following:
Rule name:
ParameterNameConvention
Message:
Method parameters should begin with a lowercase "p"
Description:
Method parameters should always begin with a "p".
Example:
public void bringItHome( String pName, int pNumber, boolean pDoneThat, List pTr)
Change rule priority toError high
Click onAdd property...and enterxpathas name and//FormalParameter/VariableDeclaratorId[not (starts-with(@Image, 'p'))]as value.
Click onOKand agree to rebuild.
In Package Explorer right-click onQA Projectand selectPMD|Check Code with PMD. Open the PMD Violations view. It should display threeParameterNameConventionviolations inYang.java.
This one-line XPath rule tells PMD to watch for method parameters whose VariableDeclaratorId name ('Image') does not start with a "p". Very elegant.
XPath-based PMD rules offer an efficient alternative to Java-based rules. As more development tools become XPath-compatible it is likely that an investment in this powerful query language will prove valuable for Java developers.
Wish List
I must admit, I am impressed by PMD's capabilities. It has proven itself as a production grade tool, capable of handling large volumes of Java source files. There are couple of things I wish PMD had. The list below is dedicated to what's missing or can be improved.
Add better filtering capabilities to the PMD Violations view. For example add pagination, an important feature when working on large projects. Similarly, improve memory management - large projects may cause the environment to run out of memory.
Improve code checking capability by adding advanced query options. For example, add ability to check for a specific rule violation. Support by generating reports for specific rule violation or other more advanced search queries.
Move the report generation context menu from the project menu into the PMD Violations view. Support this functionality with advanced filters so that generated could reports include a subset of the violations and not be limited to the entire set.
Simplify the rule addition process. Today, Java rules are a bit of a complication to add. Create a WEB-INF-type folder under the core plugin where the classloader would monitor for custom rule implementation classes. This would free developers from having to create plugin fragment projects and a single rule class would be sufficient.
Since XPath is such a powerful and efficient way to add custom rules, use AST trees generated from source files to visually guide developers while creating XPath queries. This would help people with little or no XPath experience to begin writing custom rules faster. Alternatively, create an XPath based visual AST editor for Eclipse.
Improve the PMD Preferences page. Add multi-line support for Rule properties - important when adding XPath rules.
Summary
There is little doubt that code quality is becoming a prime factor in today's software economy. Many companies are taking real steps to transform old-fashioned, paper-based and in many cases simply ineffective QA practices into modern, efficient, value-added software lifecycle practices. In this path, they are realizing the power of software as a tool to check, correct and improve itself. And a new breed of automated code analyzers is slowly emerging. Designed to free developers from repetitive and error-prone manual code checks, these software "robocops" take the burden from developers, thus enabling them to spend more time on real design and performance issues such as patterns and multithreaded execution.
Automated code analyzers are not meant to replace manual QA. Instead, they should be used in tandem with well-designed manual review processes. Research shows that companies using automated QA tools with paperless, manual QA gain competitive advantage by considerably reducing software maintenance costs. This reduction comes mainly from lower number of defects and less time spent on each defect.
PMD and Eclipse are two great tools for improving personal code quality as well as implementing a consistent company-wide coding convention. PMD operates by applying a set of rules to source files. It comes with a rich suite of rules which can be extended in two ways. The traditional way of adding new rules to PMD is by implementing the rule class in Java and then adding it to the plugin's classpath. PMD has recently added XPath support for custom rules. XPath helps PMD take advantage of the fact it operates on an XML-based Abstract Syntax Tree. Compared to Java rules, XPath rules are much shorter and look way cooler. XPath is a powerful XML query language capable of small wonders. The elegance and beauty of XPath makes it a great choice for developing custom PMD rules.
1. 사용법 reflection의 사전적의미는 "반사", "영상"이라는 뜻이다. 즉, java에서 정의된 class객체에 대한 하나의 상을 담을수 있는 그릇을 만든다고 생각하면 이해가 쉽다. 여기서 한가지 더 알아야 할것이 java의 Class객체이다. jdk에 기술된 내용을 보면
------------------------------
Instances of the classClassrepresent classes and interfaces in a running Java application. Every array also belongs to a class that is reflected as aClassobject that is shared by all arrays with the same element type and number of dimensions. The primitive Java types (boolean,byte,char,short,int,long,float, anddouble), and the keywordvoidare also represented asClassobjects.
Classhas no public constructor. InsteadClassobjects are constructed automatically by the Java Virtual Machine as classes are loaded and by calls to thedefineClassmethod in the class loader.
------------------------------- 간단하게 살펴보면 Class 객체는 java에서 사용되는 모든 class와 interface, array등을 표현할 수 있으며 Class객체는 생성자를 포함하고 있지 않으므로 다음과 같은 방법으로 사용된다. void printClassName(Object obj) { System.out.println("The class of " + obj + " is " + obj.getClass().getName()); } (여기서 getClass는 object객체에서 제공된는 메소드이며 Class형태로 return 된 값을 getName()이란 Class객체에서 제공하는 메소드로 반환하고 있다.) 이처럼 Class객체에서는 class의 내부정보(class명, 생성자, 메소드, 멤버변수)등을 표시하는 메소드들을 제공하는데 이를 담기위한 그릇의 형태로 Reflection API가 사용된다. 여기서 getClass() 메소드 대신 .class라는 class literal이 사용 가능하다. .class에 대한 정의는 다음과 같다. --------------------- A class literal is an expression consisting of the name of a class, interface, array, or primitive type followed by a `.' and the token class. The type of a class literal is Class. It evaluates to the Class object for the named type (or for void) as defined by the defining class loader of the class of the current instance. --------------------- 즉, 객체.class를 사용하면 .getClass()와 같은 효과를 얻을 수 있다.
Class에서 제공되는 메소드를 이용하여 Reflection API에 값을 담아 표시하는데 주요 사용되는 Class메소드 - Reflection API는 다음과 같다.
------------------------ Class cls = 객체.getClass();
* Reflection API = Class 메소드 cls.getName(); //클래스 이름 cls.getSuperclass();//상위클래스 //modifier : class의 구분자여부를 확인 int mods = cls.getModifiers(); java.lang.reflect.isPublic(mods);//class가 public 인지 java.lang.reflect.Modifier.isProtected(mods) java.lang.reflect.Modifier.isPrivate(mods)); java.lang.reflect.Modifier.isFinal(mods)); java.lang.reflect.Modifier.isStatic(mods)); java.lang.reflect.Modifier.isAbstract(mods)); java.lang.reflect.Modifier.isInterface(mods));
//Fields : class의 멤버변수 java.lang.reflect.Field[] fields = cls.getDeclaredFields(); //멤버변수들을 가져옴 java.lang.reflect.Modifier.toString(java.lang.reflect.field.getModifiers());//필드의 구분자를 가져옴. java.lang.reflect.field.getType(); //멤버변수의 타입을 Class형태로 return 되므로 .getName()으로 값을 가져옴 java.lang.reflect.field.getName(); // 멤버변수의 이름을 return
getFields vs getDeclaredFields : Declared가 붙는 경우는 private, public 값을 다 가져 오지만 없는 경우는 public 값만 가져온다.
-----------------------------------
2. 활용법 자 이제 reflection의 개념을 알았으니 실제 활용법을 알아보자. 동적으로 메소드를 호출하는법에 대해 알아보겠다. 동적 메소드 호출이라고 하면 메소드를 파라메터로 받아 호출하는 것으로 ejb대신 servlet+동적메소드 호출 방식으로 사용이 가능하다.
소스를 살펴보자
------------------------ //dynamic method invocation 파라메터 : String ctrName, Connection conn, Data data
1: Class ctrClass = Class.forName(ctrName); 2: Constructor constructor = ctrClass.getConstructor(new Class[]{Connection.class}); 3: Object object = constructor.newInstance(new Object[]{conn}); 4: Method method = ctrClass.getMethod(methodName, new Class[] { Data.class }); 5: Object resultObj = method.invoke(object, new Object[] { data });
-------------------------------- class의 이름을 동적으로 받아 내부 메소드를 동적으로 호출하는 예제이다.
1번째 줄에서는 class의 이름을 받아(ctrName) Class 객체를 찾는다. 2번째 줄에서는 찾은 Class 객체에서 생성자를 호출하는 부분으로,new Class[]{Connection.class}를 파라메터값으로 Class객체의 생성자를 찾아와 Reflection API인 Constructor 객체에 담는다. - 이 소스에서는 Connection 정보가 생성자로 들어간다. 3번째 줄에서는 생성자를 이용하여 새로운 객체를 생성한다. 이때 new Object[]{conn}값이 생성자의 파라메터로 들어가며 conn 값은 소스의 윗부분에서 connection 정보를 객체로 생성해 놓은 값이다.
즉, 1~3번째 소스를 통해 class이름을 받아 class의 생성자를 값으로 얻어 이 class의 instance를 생성했다. AAA aa = new AAA("초기값"); 이란 부분을 동적으로 생성할 수 있게 된 것이다. 이제 aa.process();를 동적으로 호출해 보자
4번째 줄에서는 reflection API인 Method 객체에 Class객체에서 메소드 값을 찾아 넣어준다. 이때 메소드의 파라메터는 Data객체의 형태로 들어오는것을 찾는다. 5번째 줄에서는 찾은 메소드에 대해 invoke를 통해 해당 메소드를 호출하는데 파라메터로는 3번째줄에서 찾은 Class의 객체와 실제 호출될때 파라메터로 들어가는 값이 된다. 실행된 메소드의 return 값은 resultObj에 들어가게 된다.


![[버전 6.0.2]](http://pic.dhe.ibm.com/infocenter/wasinfo/v6r0/topic/com.ibm.websphere.express.doc/info/v602.gif) 제품이 정부 규정을 충족시키는 방법에 대해서는
제품이 정부 규정을 충족시키는 방법에 대해서는  IBM® WebSphere Application Server, 버전 6.1은 완전한 J2EE 인증 테스트 수행을 완료했습니다. 이 제품은 모든 J2EE 1.4 API를 지원합니다.


 Eclipse Test Project -